> For the complete documentation index, see [llms.txt](https://docs.hablla.com/llms.txt). Markdown versions of documentation pages are available by appending `.md` to page URLs; this page is available as [Markdown](https://docs.hablla.com/hablla-docs-en/hablla/settings/departments/how-to-configure-departments-within-hablla.md).

# How to configure Departments within Hablla

The sectors in Hablla are essential for organizing support and routing interactions to the most appropriate teams, ensuring specialized categorization that makes support faster and more accurate. Below is the step-by-step guide to configuring sectors efficiently.

\
Important: to perform this action, you need to have a user with Administrator access.&#x20;

<br>

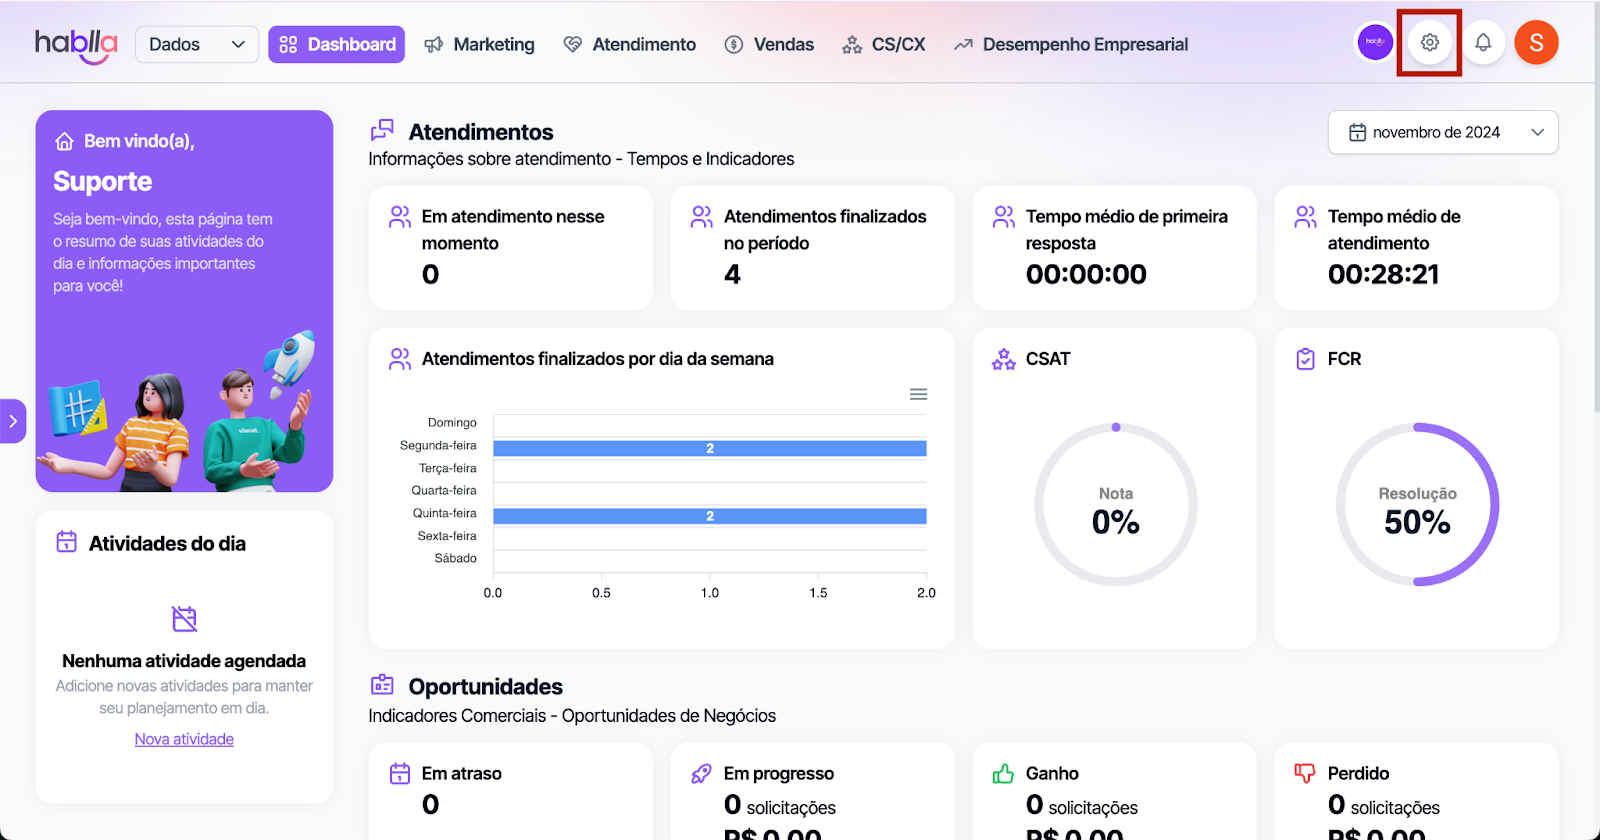
1. Once logged into your account, go to the [Studio](https://studio.hablla.com/workspace/643d802021b6aa9234eb9797/marketing). In the upper-right corner of the screen, next to the initial of your name, you will find the Settings icon (gear). Click it to open the settings menu.

<br>

<figure><img src="https://1592162275-files.gitbook.io/~/files/v0/b/gitbook-x-prod.appspot.com/o/spaces%2FrmxWrIrMauHcIrsuqfGq%2Fuploads%2F7PgyVnzAMenyOuXvkiyM%2Funknown.png?alt=media&amp;token=491694aa-ccb5-4722-b9cc-41b99f83260e" alt=""><figcaption></figcaption></figure>

<br>

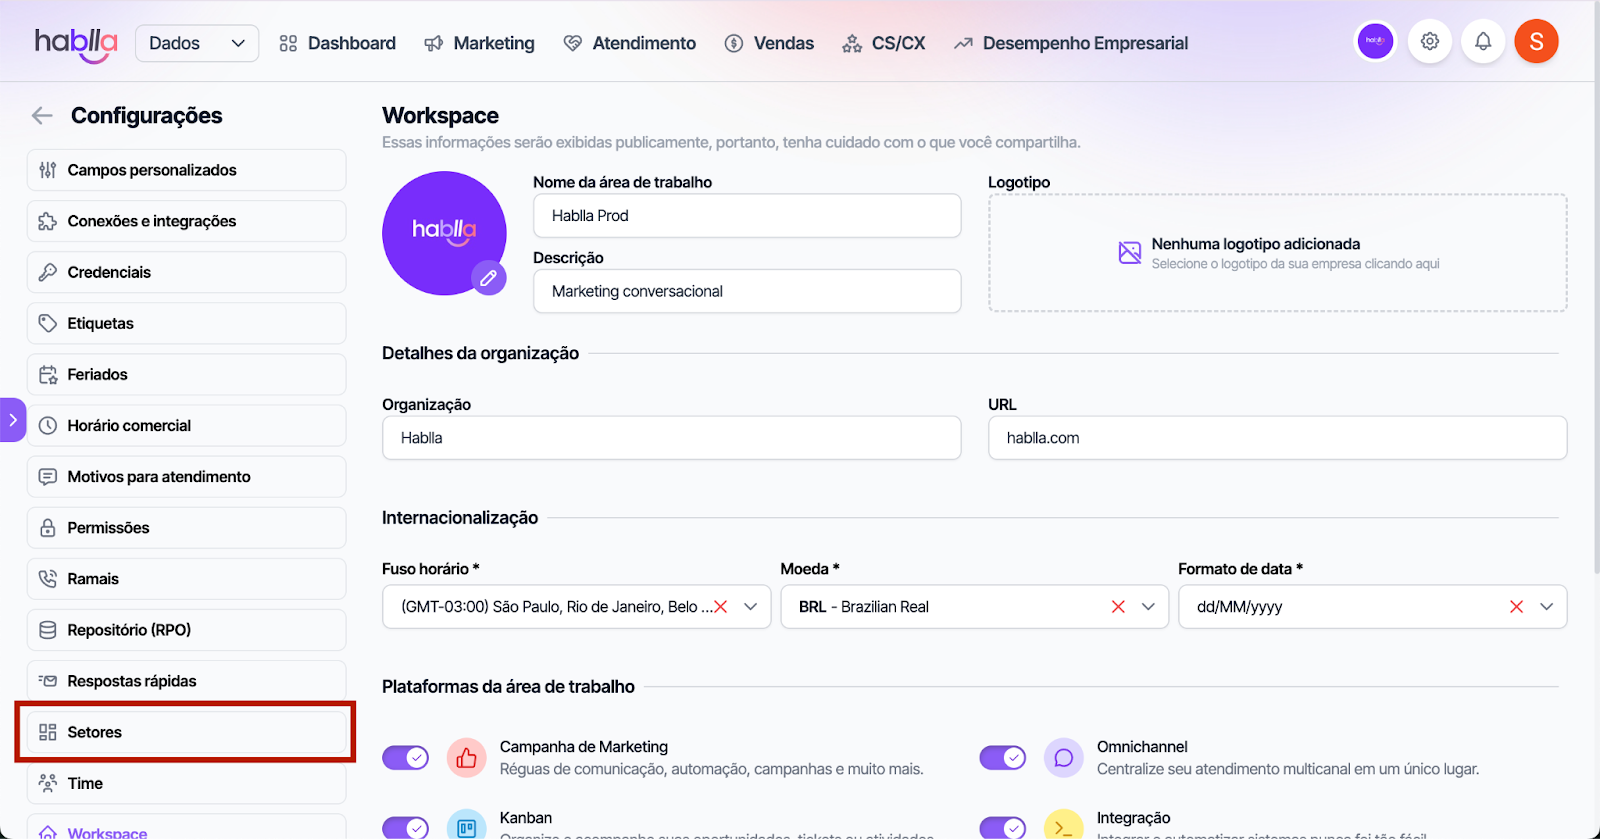
2\. In the settings menu on the left, select Sectors to access the configuration options.\
\
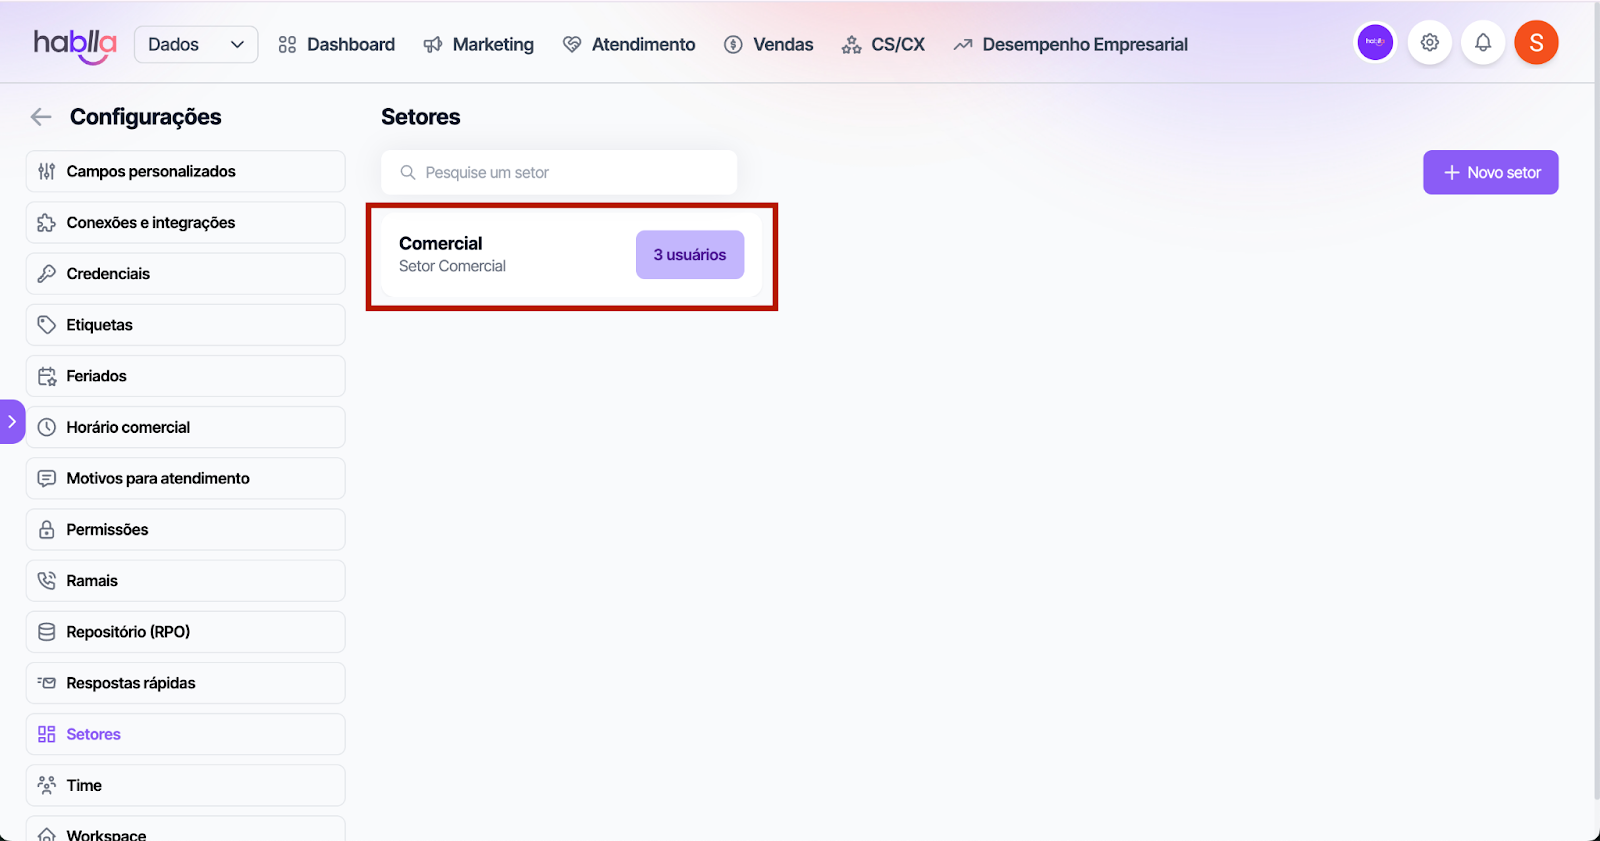
3\. Select the Sector to Configure

<figure><img src="https://1592162275-files.gitbook.io/~/files/v0/b/gitbook-x-prod.appspot.com/o/spaces%2FrmxWrIrMauHcIrsuqfGq%2Fuploads%2F5UpV2MgHyMNY91WGdmAo%2Funknown.png?alt=media&amp;token=13af96c1-0804-46df-af97-c62516f36339" alt=""><figcaption></figcaption></figure>

Choose the sector that has been created but is not yet configured to start customizing it.\
\
\
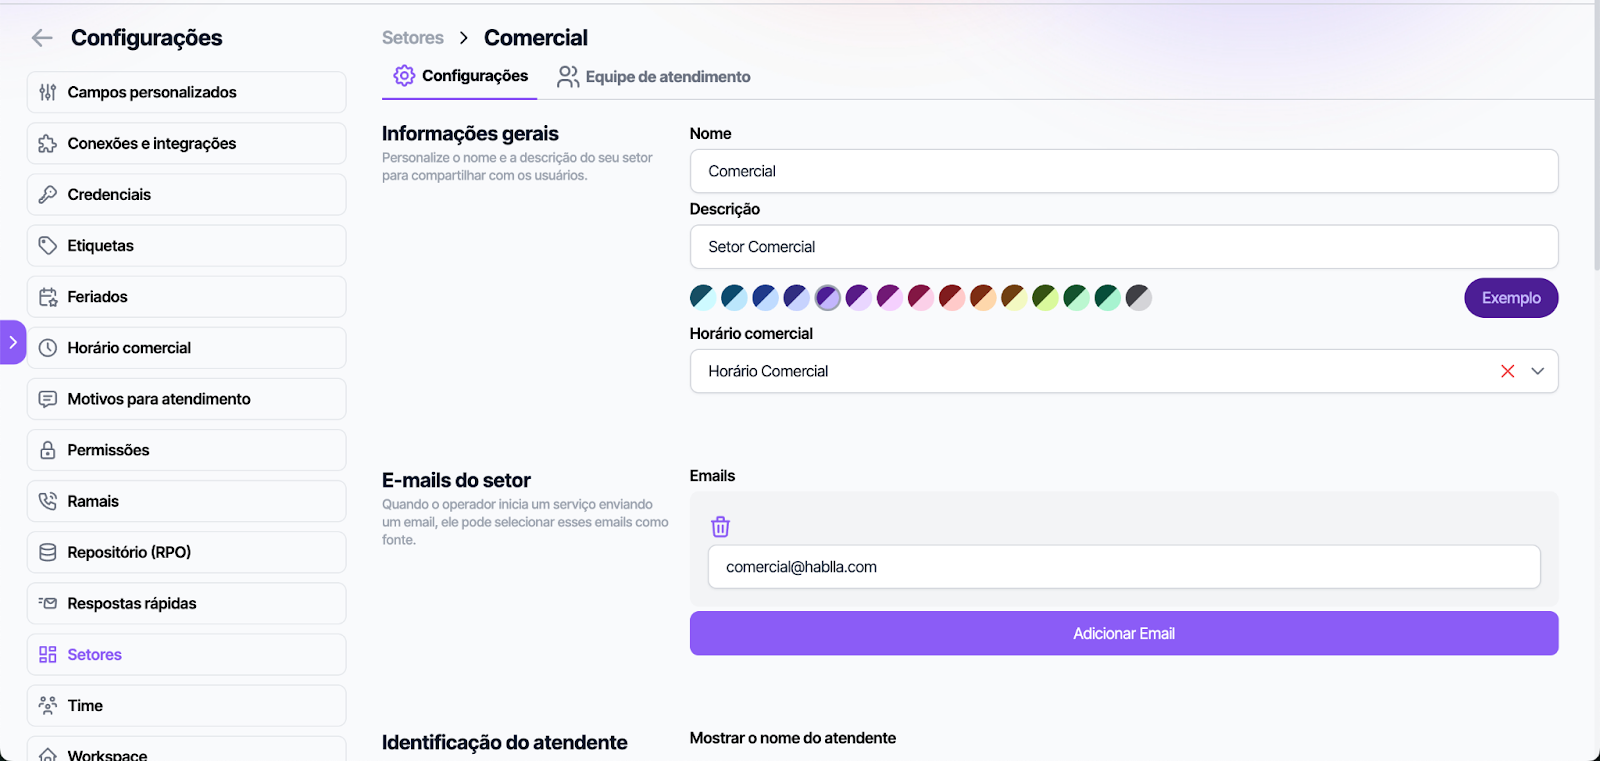
4\. Customize Name, Description, Color, and Business Hours

<figure><img src="https://1592162275-files.gitbook.io/~/files/v0/b/gitbook-x-prod.appspot.com/o/spaces%2FrmxWrIrMauHcIrsuqfGq%2Fuploads%2FY8YHevVpKckvFHj5uWIc%2Funknown.png?alt=media&amp;token=ba1aed54-2f63-44da-8aa0-4043c304958b" alt=""><figcaption></figcaption></figure>

* From this point on, you can edit the sector name and description, as well as set a color for visual identification.
* Set the predefined Business Hours, which can be adjusted according to your sector's needs (learn more about setting hours here).\
  \
  4.1 Add Sector Email
* Set up the email so that, when sending messages, support uses a sector-specific email address.
* Example: <commercial@hablla.com>.

<br>

<figure><img src="https://1592162275-files.gitbook.io/~/files/v0/b/gitbook-x-prod.appspot.com/o/spaces%2FrmxWrIrMauHcIrsuqfGq%2Fuploads%2FEARgxqs0ODcnkelYSFpQ%2Funknown.png?alt=media&amp;token=ceb37652-52ad-4d88-ab0b-630b30711d9a" alt=""><figcaption></figcaption></figure>

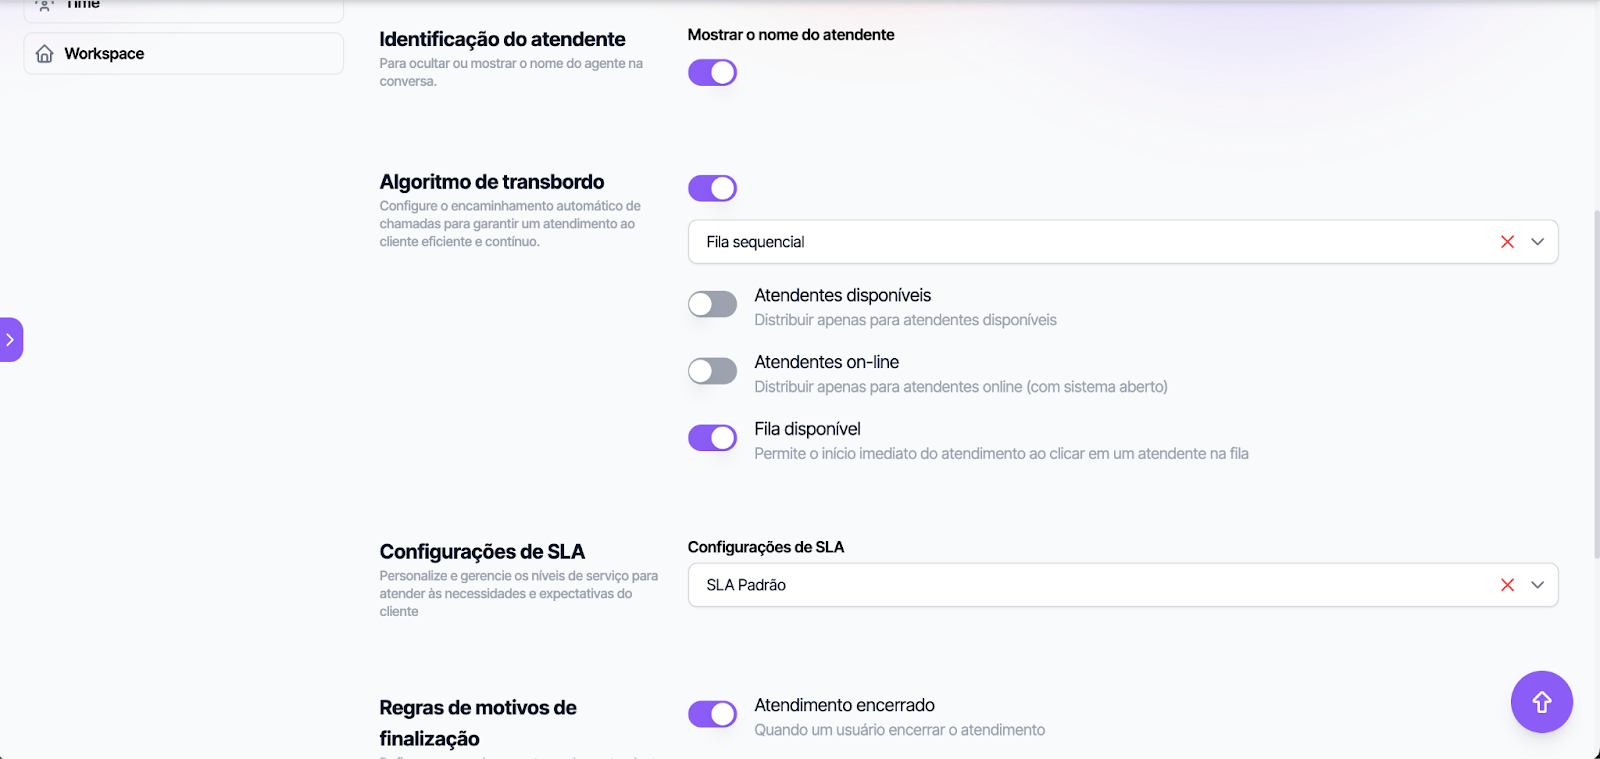
6 Agent Identification

* Define whether the agent's name will be displayed in conversations with the customer, further personalizing communication.\ <br>

  <figure><img src="https://1592162275-files.gitbook.io/~/files/v0/b/gitbook-x-prod.appspot.com/o/spaces%2FrmxWrIrMauHcIrsuqfGq%2Fuploads%2FJKpEGkFY7WJqKBqleBzm%2Fimage.png?alt=media&amp;token=3c5645a3-159d-4404-b247-d3d33aa9b1e2" alt=""><figcaption></figcaption></figure>

6.1 Handover Algorithm Settings

* Set up automatic routing to ensure support follows an effective and continuous logic.

### Handover algorithms

The handover algorithm defines **how the distribution queue chooses the next agent** who will receive a new item. Each algorithm has a different balancing strategy, allowing distribution to be adapted according to operational needs.

<table><thead><tr><th width="165.137939453125">Algorithm</th><th width="291">How it works</th><th>When to use</th></tr></thead><tbody><tr><td><strong>Sequential Queue</strong></td><td>Distributes items in a fixed order among the agents in the queue. After the last agent receives an item, distribution starts again with the first one on the list.</td><td>Ideal when all agents have the same capacity and you want predictable, balanced distribution.</td></tr><tr><td><strong>Lowest number of interactions during the day</strong></td><td>Directs the next item to the agent who received <strong>the fewest interactions during the day</strong>, balancing the volume distributed daily.</td><td>Recommended for operations that want to maintain a fair division of the daily workload among all agents.</td></tr><tr><td><strong>Lowest number of open interactions</strong></td><td>Routes the item to the agent who has <strong>the fewest open interactions</strong> at the time of distribution.</td><td>Indicated when the goal is to distribute the workload considering only the interactions still in progress.</td></tr><tr><td><strong>Lowest number of open interactions with limit</strong></td><td>Works the same way as the previous algorithm, but respects a <strong>maximum limit of simultaneous interactions</strong> per agent. When the limit is reached, the agent stops taking part in distribution until they are back below the limit.</td><td>Ideal for preventing agent overload and controlling the maximum number of simultaneous interactions.<br><br>⚠️ <strong>Important:</strong> This algorithm works only for users who use <strong>Custom Permissions</strong>, since the interaction limit is configured in the user's permission. See the documentation for <strong>Custom Permissions</strong> to configure this limit.</td></tr><tr><td><strong>Random</strong></td><td>Randomly selects one of the available agents in the queue to receive the next item.</td><td>Recommended when there is no need to follow a specific order or load-based balancing.</td></tr><tr><td><strong>Weight by Agents</strong></td><td>Distributes items considering the <strong>weight configured for each agent</strong>. The higher the weight, the greater the likelihood that that agent will receive new items.</td><td>Indicated for teams where some agents have greater capacity, experience, or availability and, therefore, should receive a larger volume of interactions.</td></tr></tbody></table>

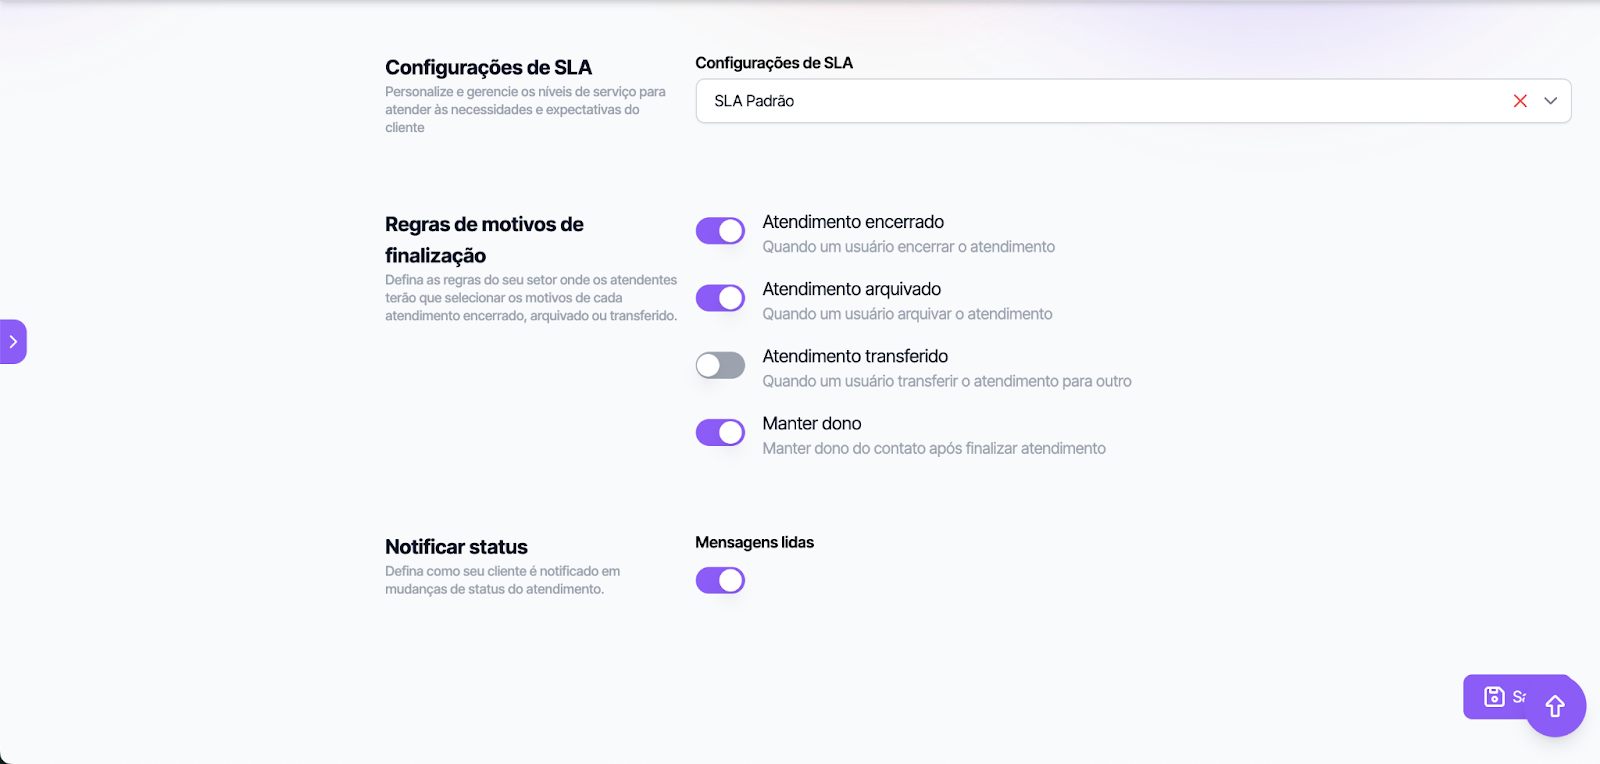
6.2 SLA Settings

* Customize the SLA (Service Level Agreement) to meet customer expectations and ensure fast, effective responses. (Learn more about SLA settings here).

<br>

<figure><img src="https://1592162275-files.gitbook.io/~/files/v0/b/gitbook-x-prod.appspot.com/o/spaces%2FrmxWrIrMauHcIrsuqfGq%2Fuploads%2FdRDNiZZ8iv9KLScLV1IK%2Funknown.png?alt=media&amp;token=33bbeebc-5af3-4162-bc72-85e617d6c406" alt=""><figcaption></figcaption></figure>

7\. Define Resolution Reason Rules

* Specify rules for recording the reason for each closed, archived, or transferred interaction:
* Closed Interaction: Select the reason for closing the interaction.
* Archived Interaction: Define the reason when archiving.
* Transferred Interaction: Reason for transferring to another agent.
* Keep Owner: Choose whether the current agent will remain responsible for the customer after the interaction ends.
* Status Notification: Set up notifications so the customer is informed about status changes, such as read messages.\
  \
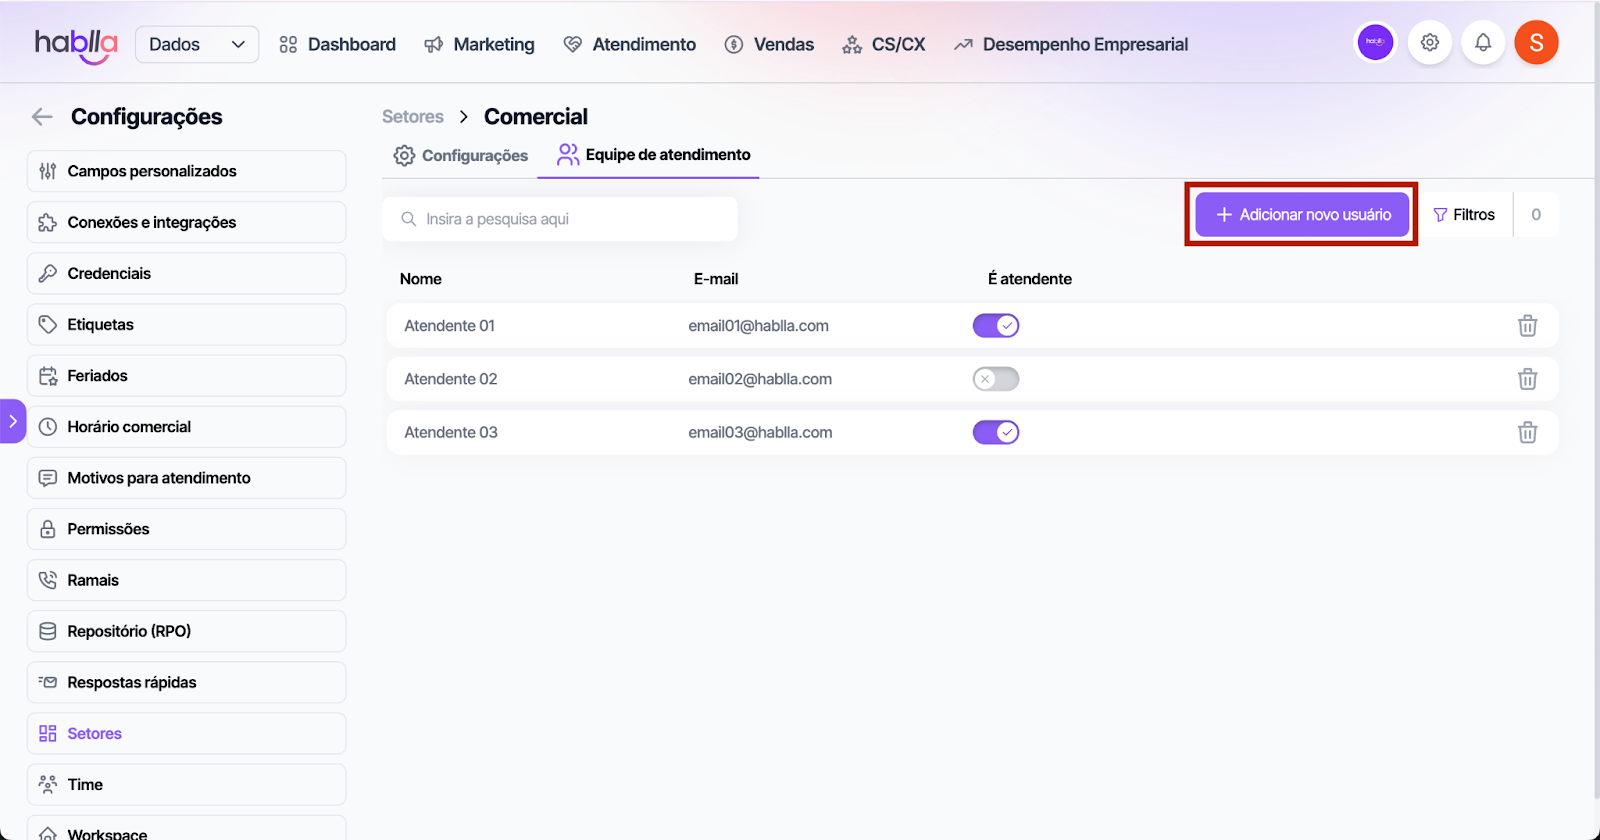
  8\. Add Your Team to the Sector

<figure><img src="https://1592162275-files.gitbook.io/~/files/v0/b/gitbook-x-prod.appspot.com/o/spaces%2FrmxWrIrMauHcIrsuqfGq%2Fuploads%2FelN50DoXlFKlKOCVwQQg%2Funknown.png?alt=media&amp;token=54fcce45-7e09-4fc9-98ca-f01034bbd41d" alt=""><figcaption></figcaption></figure>

* Go back to the top of the screen and click on Support Team to associate your team with the sector.\
  \
  9\. Click to add a new user\
  \
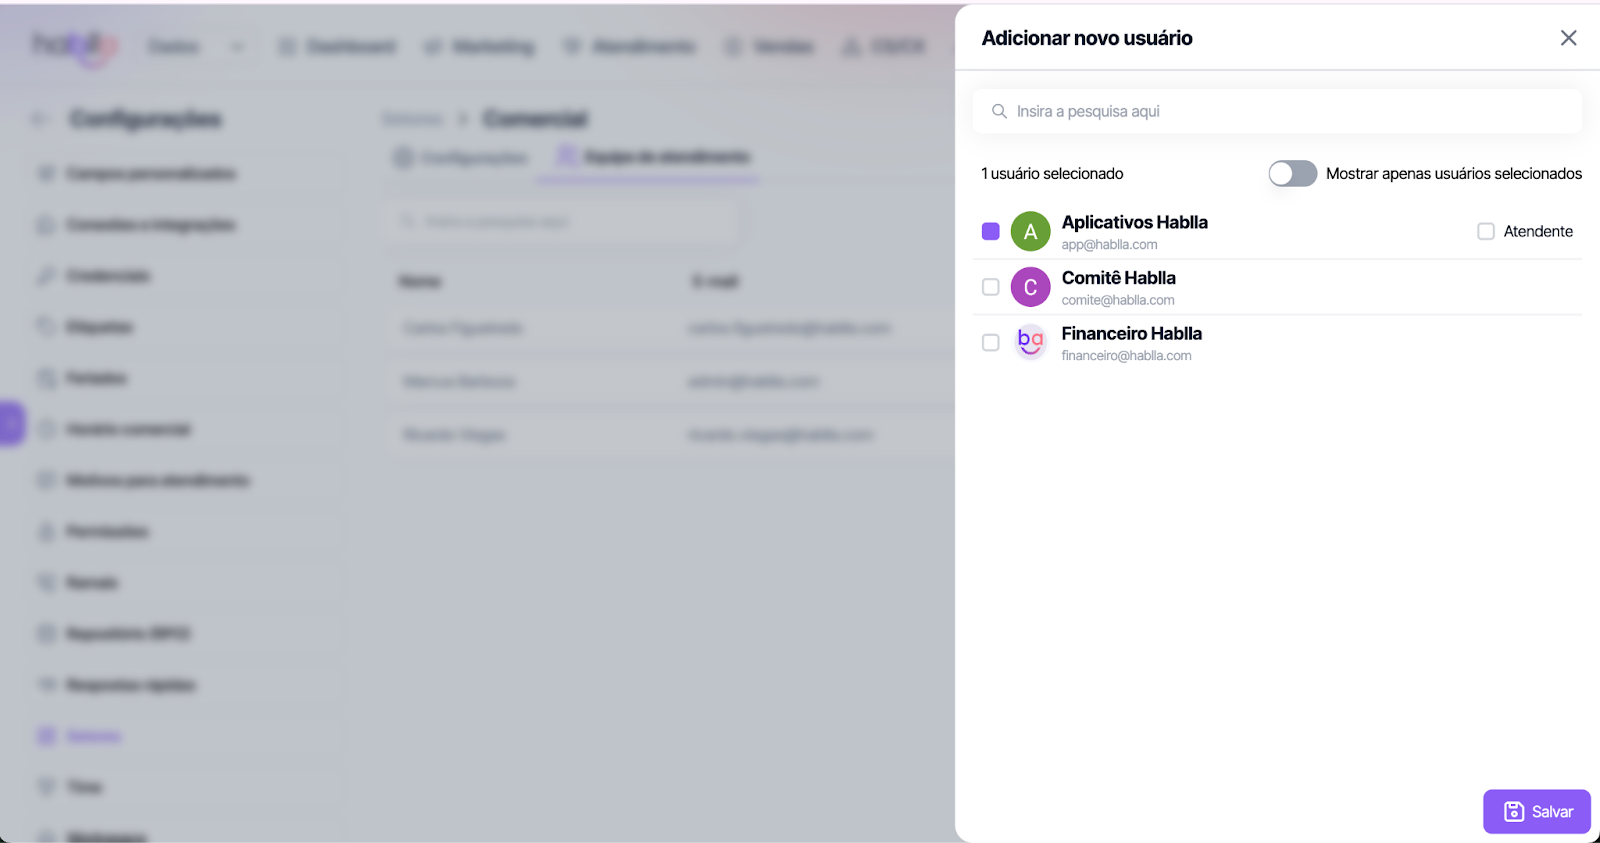
  10\. Add New User to the Sector

<figure><img src="https://1592162275-files.gitbook.io/~/files/v0/b/gitbook-x-prod.appspot.com/o/spaces%2FrmxWrIrMauHcIrsuqfGq%2Fuploads%2FAiHAlfultjXBD6GkHXqW%2Funknown.png?alt=media&amp;token=cbd5ffdd-942c-4601-a5bf-97c2365bec78" alt=""><figcaption></figcaption></figure>

* Select Add new user to include members who will have access to the sector. Choose between:
* Access Permission: Users with access to the sector's information.
* Agents: Users who will be in the support queue and handle interactions directly.\
  \
  11\. After customizing the settings, click Save.

<figure><img src="https://1592162275-files.gitbook.io/~/files/v0/b/gitbook-x-prod.appspot.com/o/spaces%2FrmxWrIrMauHcIrsuqfGq%2Fuploads%2FpikOQtpHX4pxfEwqnsW7%2Funknown.png?alt=media&amp;token=c2a97e9d-90ae-4faf-a2c8-3bea1107c75d" alt=""><figcaption></figcaption></figure>

### Configuring the Sector Agents' Weight

The agent weight is used by the algorithm **Weight by Agents** to define each user's priority in the distribution of new interactions. The higher the configured weight, the more likely that agent is to receive new interactions.

#### 1. Select the agent

On the **Support Team**, click on the name of the agent you want to configure.

<figure><img src="https://1592162275-files.gitbook.io/~/files/v0/b/gitbook-x-prod.appspot.com/o/spaces%2FrmxWrIrMauHcIrsuqfGq%2Fuploads%2FbBLrMuC9JGUxWfNYM7Rs%2Facessar_equipe.png?alt=media&amp;token=db7d7999-fad5-4789-a8da-6bc3b0a57ad2" alt=""><figcaption></figcaption></figure>

<figure><img src="https://1592162275-files.gitbook.io/~/files/v0/b/gitbook-x-prod.appspot.com/o/spaces%2FrmxWrIrMauHcIrsuqfGq%2Fuploads%2FJYS2MXFpUg4ZBuRAM1vU%2Fpeso_atendente.png?alt=media&amp;token=72095e9a-ce71-42c8-860d-2b2c16a54561" alt=""><figcaption></figcaption></figure>

#### 2. Set the priority

{% hint style="info" %}
:warning: **Note:** The weight is used only by the algorithm **Weight by Agents**. The higher the configured weight, the higher the agent's priority in the distribution of new interactions.
{% endhint %}

After selecting the agent, a side panel with their settings will be displayed.

Locate the field **Priority** and enter a **whole number between 1 and 5**, according to the table below:

<figure><img src="https://1592162275-files.gitbook.io/~/files/v0/b/gitbook-x-prod.appspot.com/o/spaces%2FrmxWrIrMauHcIrsuqfGq%2Fuploads%2F1TzwWns9m2vjX3GaH0tG%2Fdefinir_peso.png?alt=media&amp;token=cfa15194-4289-4fc2-bc8a-427140627fc7" alt=""><figcaption></figcaption></figure>

#### Available Agent Weight Levels:

<table><thead><tr><th width="82.6895751953125" align="center">Weight</th><th>Behavior</th></tr></thead><tbody><tr><td align="center"><strong>1</strong></td><td>Lowest distribution priority. The agent will receive fewer interactions.</td></tr><tr><td align="center"><strong>2</strong></td><td>Low priority. The agent will receive a smaller number of interactions compared to users with higher weights.</td></tr><tr><td align="center"><strong>3</strong></td><td>Intermediate priority. Distribution will be balanced in relation to the other agents.</td></tr><tr><td align="center"><strong>4</strong></td><td>High priority. The agent will receive more interactions than those with lower weights.</td></tr><tr><td align="center"><strong>5</strong></td><td>Highest distribution priority. The agent will receive the greatest number of interactions compared to the other users in the queue.</td></tr></tbody></table>

#### 3. Save the configuration

After setting the desired priority, click the **Save**, located in the upper-right corner of the screen.

{% hint style="info" %}
The weight **does not represent a limit on interactions**. It only influences priority in the distribution when the algorithm **Weight by Agents** is configured in the queue.
{% endhint %}


---

# Agent Instructions
This documentation is published with GitBook. GitBook is the documentation platform designed so that both humans and AI agents can read, navigate, and reason over technical content effectively. Learn more at gitbook.com.

## Querying This Documentation
If you need additional information that is not directly available in this page, you can query the documentation dynamically by asking a question.

Perform an HTTP GET request on the current page URL with the `ask` query parameter, and the optional `goal` query parameter:

```
GET https://docs.hablla.com/hablla-docs-en/hablla/settings/departments/how-to-configure-departments-within-hablla.md?ask=<question>&goal=<endgoal>
```

`ask` is the immediate question: it should be specific, self-contained, and written in natural language.
`goal` is optional and describes the broader end goal you are ultimately trying to accomplish on behalf of the user. GitBook uses it to tailor the answer towards what is most useful for that goal.

The response will contain a direct answer to the question and relevant excerpts and sources from the documentation.

Use this mechanism when the answer is not explicitly present in the current page, you need clarification or additional context, or you want to retrieve related documentation sections.